Hey everyone
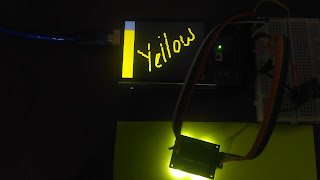
Today I am back with a new and interesting project. In this post, you will learn to make your own colour picker and use it with your Adafruit Touch shield for digital painting. The colour picker is now limited to detect up to 7 colours - Black, Blue, Brown, Green, Red, Yellow and White - but it can be programmed to detect much more. Read on further to learn how to do this project.
Hardware components used for this project
- Arduino Mega 2560
- Adafruit 2.8" TFT Touch Shield with Capactive Touch
- TCS230/ TCS3200 colour sensor module
- IR tracking sensor module
- Solderless Breadboard - Half +
- Male-to-Female Jumper wires (x8)
- Male-to-Male Jumper wires (x4)
Setup
Connection
Adafruit 2.8" TFT Touch Shield
You can simply place it onto your Arduino Mega 2560 development board.
TCS230/ TCS 3200 colour sensor module
- S0 - D34
- S1 - D33
- S2 - D31
- S3 - D32
- OUT - D30
- OE - Ground
- GND - Ground
- VCC - 5V
IR Tracking sensor module
- VCC - 5V
- GND - Ground
- S - D40
Coding
For this project, you will be needing the following libraries:
- Adafruit GFX - Core graphics library (Adafruit's guide to using this library)
- Adafruit ILI9341 - Library for ILI9341 displays
- Adafruit FT6206 - Library for FT6206 based capacitive touch screen
- SPI - Needed for display
- Wire - Needed for FT6206
The SPI and Wire libraries are built-in and you do not have to install them but the other 4 libraries have to be installed by either using the Arduino library manager or manually.
Open Arduino IDE, go to Tools and select Manage Libraries... Type in the respective libraries' names in the search bar and install the latest version.
For this project, I was inspired by the CapTouchPaint example sketch from the Adafruit FT6206 library so I advice you to first upload this example sketch to your microcontroller.
Go to File ---> Examples ---> Adafruit FT6206 library ---> CapTouchPaint. Upload this example sketch to your Arduino Mega and start experimenting to learn how the code works.
To learn how to make a colour picker, please visit one of my previous projects: Arduino based Colour detection machine. Within that post's code explanation, you will learn how to interface the colour sensor module with the Arduino development board.
Now that you may have understood about interfacing the colour sensor module, it's time for you to use that idea in this project.
You have to program your colour sensor module to 'pick' a colour correctly while your finger is hovered over the IR sensor and this colour should be displayed on the TFT display.
IR tracking sensor module will output a LOW signal when it detects an obstacle so if the LOW signal is detected, the colour sensor module should pick the colour of the object placed in front of it. The colour should be displayed on the TFT display when you tap on the margin box found on the left side of the screen. The default colour should be set to White and the default colour should be assigned when the colour sensor module detects an undefined colour.
Set the Penradius to 3 pixels.
A margin box should be drawn on the left edge of the TFT display. The fillRect( ) should be used for this purpose and the dimensions should be 240 pixels and 40 pixels. The colour used for the fill function should be the colour detected.
A grey box should be drawn on the top left corner of the screen. This will be used as the clear button. For this, you will need the fillRect( ) function and the dimesions should be 40 pixels. The colour of the box is up to you but I have used dark grey which is already defined in the ILI9341 library. The clear function must be performed when you tap within that box's dimensions. At the same time, a white rectangle should be drawn around the box to show that it has been selected and the drawRect( ) function should be used for this purpose. The white outline of the grey box should disappear after 100 milliseconds.
Please watch the YouTube video in this post to learn how this project works.
If anyone has any questions or suggestions with the coding, please feel free to comment below.
Final Look
If anyone has any questions or suggestions about this project, please feel free to comment below.


Comments
Post a Comment